Model Railway
Fault Finding and Servicing
by LC&DR
These help
notes are for the beginner to find simple faults and cure them. It does not
cover internal defects in the locomotive mechanism which may require special
tools and knowledge.
It was originally prepared for members
of the Hornby Forum, but generally can be useful to users of other makes.
|
Contents |
|
|
Train
doesn’t move |
|
|
|
|
|
|
|
|
Derailments |
|
|
|
|
|
Tools and Equipment |
|
Train
doesn't move
Is this down to the train, the power supply or the track?
Using a PP3 9-volt battery touch the locomotive driving wheels
so that the +ve terminal touches one side and the -ve terminal touches the other. If the wheels turn the
locomotive is probably okay.
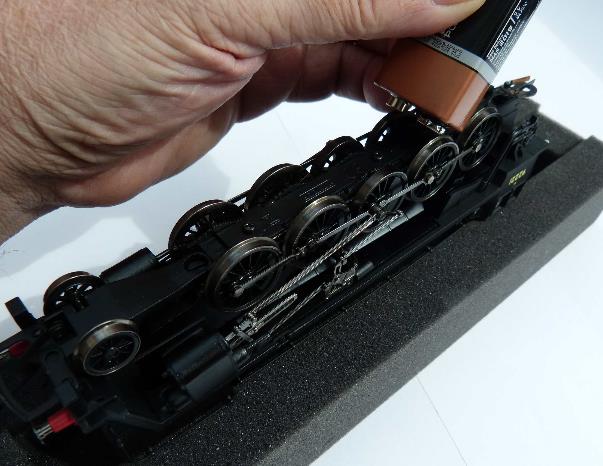
While you do this look at the wheels and see if they have dirt
on the metal treads, this can be removed using a cotton bud moistened with
Iso-Propyl-Alcohol (IPA). (See later for
one method of doing this)
If the wheels don't turn after cleaning proceed to inspect the
locomotive.
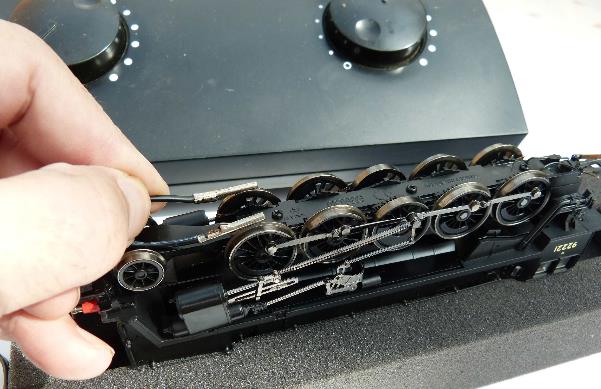
Foreign Objects in the Mechanism
Look and see if the motor magnet has attracted a pin or staple
into the mechanism or between the wheels where it short circuits the pick-ups.
If you see something that looks like it shouldn't be there and it is loose
enough to remove, remove it with tweezers, also use tweezers to remove any
fluff from inside of the locomotive mechanism.
If after cleaning the locomotive still will not run with a PP3
battery you may need to get it looked at by an expert.
Next inspect the controller - some simple things first such as
making sure the mains plug is working, the fuse is intact and is everything
connected as it should be?
Many controllers have a light on them to confirm it is working
if it is on you need then to look at the connections to the track and the track
itself.
If you do not have a multi-meter to check you have power from
the controller (and not many people have) you can use a 12- volt automotive
lamp bulb to test the output. If you can get hold of a small 12v bulb (they
sell them in car spares shops) turn the controller on and take the wires that
usually connect to the track and touch them on the bulb terminals, does it
light? If the bulb doesn’t light check the wires into the controller are tight
in the correct output sockets. (controlled DC), try again and if it still will
not light, there may be an internal problem with the controller.
You may however wish to invest in a track tester
from firms such as Train
Tech. This useful little device sits across the rails
and will light up when power is available. The LED also changes colour from red
to green depending upon the polarity which is helpful if you are trying to
synchronise two different controllers on adjacent circuits to ensure they are
co-ordinated when transferring a train from one circuit to another. If you operate DCC and DC on the same layout
(you should never do this at the same time of course) the tester also warns if
AC is present, as it will be when using DCC, by glowing orange.
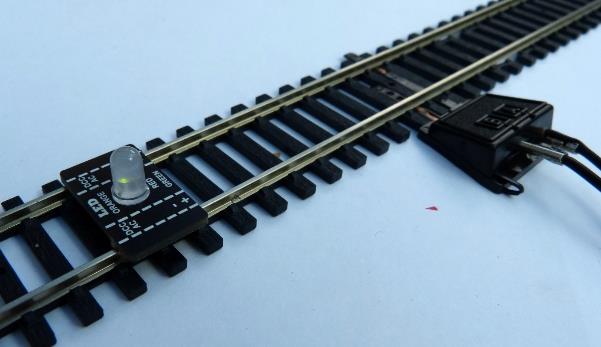
Green - nearest rail is positive
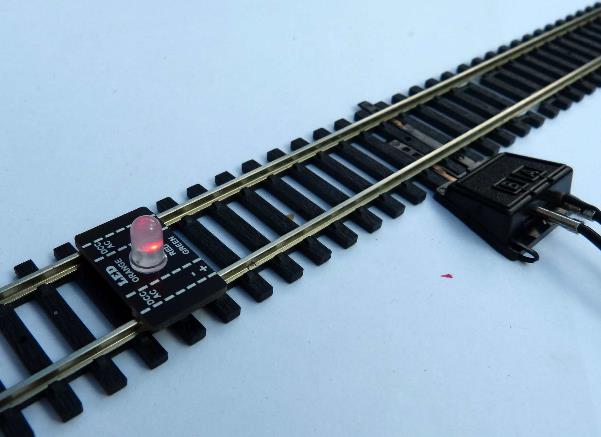
Red – nearest rail is negative
Broken Wires
It is remotely possible that there may be a break in the track
connecting wire. If you have a spare, try swapping them over.
You cannot repair a controller yourself. The cheaper ones are
probably not worth repairing and should be replaced with a new one, but a more
expensive one should be returned to the service department of the supplier.
If both the locomotive and controller work you are left with the
track.
Defective Power Connecting Rail or Power Clip
The place where the wires are attached to the track may be
defective. If your locomotive and your
controller are both working you need to check the connections to the track.
Directly apply power from the controller to the train
Final check. - Support the locomotive upside down. Turn the controller on and touch the wheels
on one side with the metal part of the supply wire and the wheels on the other
side with the other wire. The wheels should turn. If not, you may need to start all over again.
Cleaning the Wheels
While you have the locomotive upside down you can use the cotton
bud dampened with IPA as you make the wheels turn to clean off the dirt. If the
wheels are very dirty you may need to use a number of cotton buds.
Directly apply Power to the rails
With the train on the track and the controller turned on, touch
the top each rail separately but simultaneously with the wires from the
controller. If the train responds the problem may be with the connecting rail
or power clip. You may need to replace the connecting rail or clip.
Spare power clips are reasonably cheap and can be purchased from
Hornby. These are pushed under the rails at places in the track where slots are
moulded into the web that joins the sleepers. These are not too easy to see but
the picture below will give a clue to where to look for them.
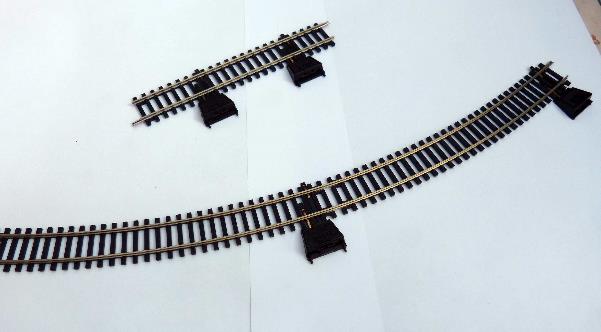
NB This only applies to Hornby rails, Peco
track base does not include these slots.
Other means of connecting the rails to the controller may be
tried. Wires soldered to rail joiners may be purchased and substituted for the
original wire. These replace rail joiners between two track pieces. If you are
comfortable with soldering the feed wires can be soldered directly to the side
or underside of the rails, but make sure that they do not obstruct the passage
of the train wheels.
Dirty Rails
Are the rails dirty?
The rail head will occasionally get dirty, dust may accumulate
on the rails and moisture in the air may have turned this into gunge. A soft
fluff free cloth moistened with a little IPA can be used to clean the rail
tops. A rectangle of hardboard approx. 3cm x 6cm fluffy side downwards can be a
very effective dirt remover, off cuts of hardboard are useful to keep for this
purpose. Track rubbers sold by Hornby can also be used but should be used
sparingly because they are abrasive. A green kitchen washing up scouring sponge
can also be used to remove stubborn dirt, but only use a dry one.
Don't use sandpaper or emery cloth to clean the track. It
scratches on the rail surface and this will attract dirt.
Bad Rail Joints
Are the rail joiners tight?
All rail joiners (also called fishplates) must be gripping the
rails on both track pieces, and fitting snugly around the foot of both rails.
Firstly, make sure the rail joiners are correctly located. With the track
pieces joined you should not feel any bump or ridge when you stroke your finger
across the joint.
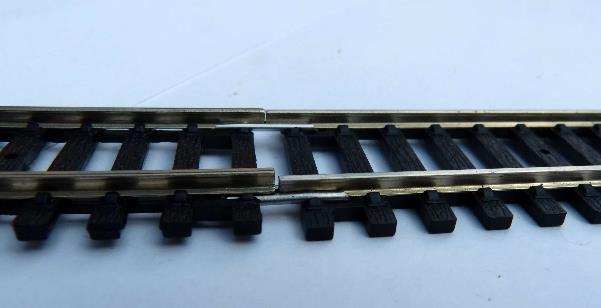
This is wrong and will result in derailment
With regular dismantling and remaking a layout the rail joiners
may become loose and may reduce the capability to transmit current. With both
track pieces joined and pushed together a gentle squeeze on the rail joiners
with narrow nosed pliers will help to improve the grip.
It is not however a good idea to squeeze the rail joiner when
there isn’t a rail inside it as it may distort and then be difficult to re-make
the joint.
Short Circuits
You need to check that there isn't something of metal bridging
across between the two rails, a staple or a pin perhaps. Pay particular
attention to points where rails of different polarity are closer together.
A small magnet can sometimes be useful at finding stray pins on
the track.
Unusual Track Layouts
Certain track layouts can cause complications. A Return loop
where the track turns back on itself at the same set of points will set up a
short circuit. If you wish this type of layout you need to incorporate
insulated sections on the loop and switching so that the polarity can be
reversed while the train is stopped on the loop. It is usually best to avoid
such situations.
Using two controllers usually work fine, but if the track
sections that they supply is connected by points care has to be exercised when
the points are changed to move from one section to the other. It is usually good practice to replace the
rail joiners at the place where the sections join with insulated rail joiners.
There are a number of factors that may cause
derailments.
Bad track
Track which is uneven or not joined up correctly.
If not on a flat and level surface rails (especially at curves)
may twist, so that wheels will not always be on the rails at the same time.
This will result in derailment. Track performs much better when the rails are
pinned to a flat level board. It is especially necessary that points are laid
flat.
Badly made joints between rail pieces will cause derailment. If
the rail joiner is not firmly holding both rail feet and the ends of both rails
are touching there will be a gap or obstacle into which wheels may bump as the
pass over and a derailment becomes much more likely. Feel the surface of both
rails at the joint with your finger tip. If you clearly feel the joint it is
wrong. Remake it.
The rails on adjacent track pieces should be aligned to avoid
‘dog-legs’. Trouble can be incurred if there is an angle between adjacent
pieces. Check by eye when you lay the track that both pieces are correctly
lined up.
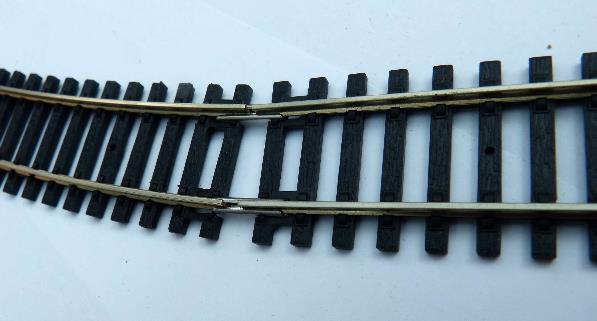
The track here is badly joined, and may cause derailment
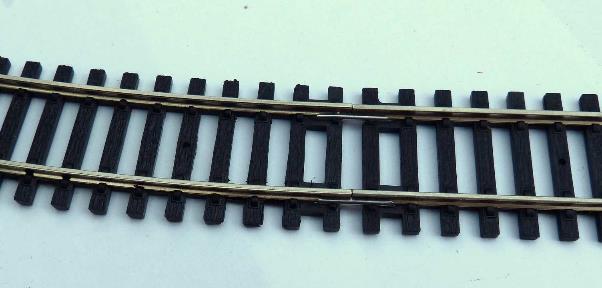
This is better, the rails are closed up and in line
Extraneous objects on the track may cause a derailment. Keep the
track clear of obstructions. Between the switch blades of points is especially
vulnerable. Regular inspection is essential.
Displaced
Axles
Vehicle wheels which are not properly aligned will cause
derailments. Modern vehicles use pin-point bearings running in depressions
inside the axle-guards. A vehicle which
has been roughly handled or dropped may have the pin-points displaced. Inspect
and if necessary adjust the wheel set by easing the axle-guard apart and
re-seat the pin-point axles.
Back-to Back
Modern ‘00’ wheels should normally be 14.5mm between inside
faces and if narrower (or wider*) will lead to derailments, especially at
turnouts (points). It is possible to buy a special gauge to measure this, but
it is perfectly possible to use a cheap Vernier gauge instead.
Wheels found to be out of adjustment can usually be adjusted by
gently sliding them on the axle. Locomotive driving wheels should only be
tackled by experienced modellers.
* Specialist finescale
modellers may use up to 14.85mm which is not recommended for proprietary
rolling stock.

More on Back-to-Backs may be found on this website
under Wheel-Rail
Interface.
Twisted
chassis
Probably not too likely on proprietary items, but kit built or
scratch built rolling stock may have a twist in the chassis which means the
wheels are not all in line. A good way to check this is to place the vehicle on
a sheet of plate glass and see if the vehicle will rock. A source of plate
glass may be a small smooth glass chopping board purchased from a Pound shop or
similar.
A severely rocking chassis may not be easy to cure, and the
vehicle may have to be confined to the repair siding or scrap yard
Lubrication
Model railway vehicles and locomotives will need lubrication
occasionally BUT only a very small amount. As a rule of thumb if you can see
the oil you have put on too much!
The recommended method is to dip a pin or an unwound paper clip
held in a cork into the bottle of oil and touch the bearing to be lubricated
with the end of the pin. One touch is usually enough. Any visible excess needs
to be wiped off with tissue. Also avoid
getting it on plastic or painted parts.
There are special model railway oils available and these must be
used in preference to any other. NEVER use WD40, motor oil or any other mineral
oils as these will attack and damage plastic, and frequently form heavy sticky
gunge.
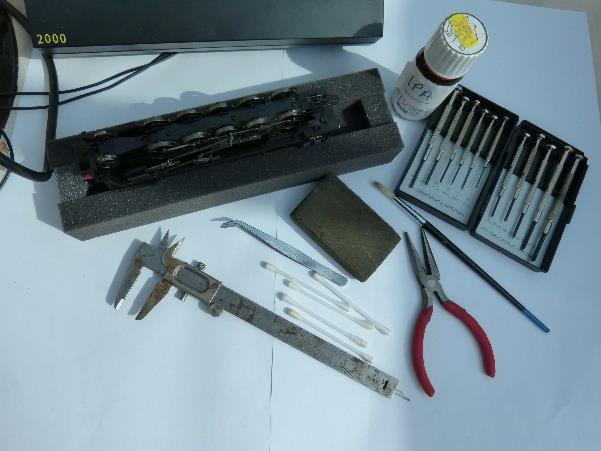
Here is a selection of basic tools that can be used to service
your railway:
|
Fine screwdrivers |
Cotton Buds |
Soft Paint Brush |
|
Narrow nose pliers |
Craft knife |
Green Scourer |
|
Tweezers |
Track Rubber |
Oil dropper |
|
PP3 Battery |
Vernier Gauge |
Bottle of IPA |
|
A service cradle can also be most useful. |
||
Some of them can be seen here
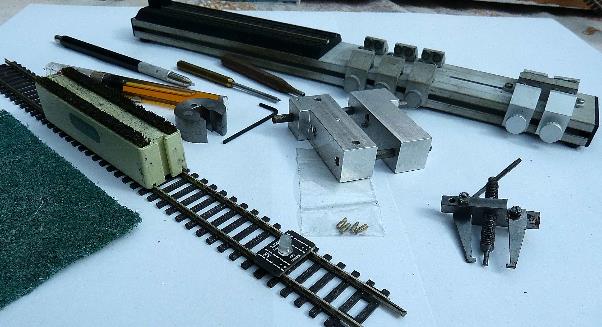
More specialist tools and equipment are shown below, these
include wheel quartering tool, wheel puller, rolling road (useful for running-in
and testing) back-to back gauge, special wheel spanners, oiler, and track
tester. However, most of these will not be essential to a beginner.
Good luck!
© LC&DR
Hosted by www.BloodandCustard.net